Showing posts with label distress ink. Show all posts

Monday, September 10, 2012

Penny Black Mini Cards

I read about the Penny Black Mini Card Contest a couple of days ago, but my weekend was so busy that I didn't get round to creating an entry for the contest over the weekend and was reluctantly going to give it a miss. Fortunately, with the time difference between Australia & US, the contest didn't close until Monday 5pm AEST (12am PST). At 3pm Monday afternoon, with just under 2 hours to go, I decided to try and quickly get an entry in.

I quickly scanned through my stamp stash, trying to decide what to use, when I came across this cute little  set:

30-103 ...wishes

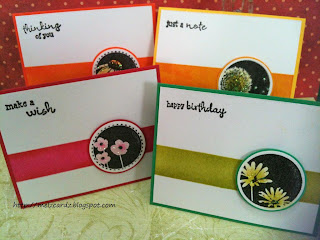
I've had this stamp set in my stash for some time, but only ever used the little sentiments out of it. I decided to give them a go and after a bit of experimenting, this is what I came up with. They were pretty quick and easy to do, and once I made the first one, I was able to knock together the remaining 3 cards in quick succession.


Supplies:
Penny Black 30-103 ... wishes
Versafine Onyx Black
Stickles Glitter Glue - Crystal
Red Card: Picked Raspberry, Fired Brick & Spun Sugar Distress Ink
Green Card: Shabby Shutters & Crushed Olive Distress Ink
Orange Card: Dried Marigold, Ripe Persimmon & Squeezed Lemonade Distress Ink
Yellow Card: Mustard Seed, Spiced Marmalade & Squeezed Lemonade Distress Ink
Ink blending tools & mini daubers
Circle punches - 1-1/2" & 40mm

1) To start, I masked off a small piece of white card with scrap card, leaving a 2cm panel. For the red card, I first sponged on Picked Raspberry distress ink, then applied some Fired Brick on the edges.
2) I trimmed the card to the correct size, stamped on the sentiment in the top corner, and attached to a small red card.
3) The flower stamp was inked with Versafine Onyx Black and stamped onto white card. A little bit of Spun Sugar and Picked Raspberry distress inks were added to the flowers with a dauber. This was then punched with a 1-1/2" circle punch and layered onto a red circle punchie (40mm), and stuck on the card with foam tape. A little Stickles was added to the image to finish.
4) The finished card size, approximate 3'x4"

Once the 4 cards were finished, I quickly photographed them (taking care not to smudge the Stickles, which were still a bit wet), uploaded them to my computer and did minor "photoshop" adjustments to the pictures (I use my iPhone 3 to photograph them and unfortunately this model doesn't have a flash, so my pictures inevitably are always a bit dark, so I have to "brighten" them on the computer). Realising I had less than 10mins to go until the deadline, I frantically uploaded them to my Flickr, then to the Penny Black Flickr Group (Penny Circle). Whew! Done, with 2 minutes to spare!! Talk about a close one!!

Here are a couple of close-ups of the cards:


Saturday, September 8, 2012

Melbourne Paperific Make & Takes Aug 2012

I made up some cards for the recent Melbourne Paperific Papercrafts Expo - we ran some Make & Takes using the gorgeous Penny Black 2012 Christmas stamps. For those who couldn't join us at the Expo, I have listed the materials list and instructions.


Red-Orange Card:

  • Penny Black 4273K winter berries
  • Penny Black 4289E beautiful season
  • Tim Holtz Distress Inks - Barn Door & Spiced Marmalade
Blue-Green Card:
  • Penny Black 4272K a splash of winter
  • Penny Black 30-140 christmas cheer
  • Tim Holtz Distress Inks - Shabby Shutters & Tumbled Glass

In addition, we also used on both cards: 
  • Ranger Inkssentials Ink Blending Tools
  • Ranger Stickles & Liquid Pearls
  • Tsukineko Versafine Onyx Black
  • Plaid Simply Stencils (blank stencil)
  • Spellbinders Nestabilities Small Mega Deckled Rectangles 
  • Dragonfly Crafts Self-adhesive Rhinestones
1) A stencil template was cut from a blank stencil using Spellbinders Nestabilites Small Mega Deckled Rectangles. (If you do not have a blank stencil, simply cut from a piece of blank cardstock, preferably gloss).
2) The template was used as a mask and distress inks were applied to the card within the template window using the ink blending tools - barn door & spiced marmalade for the red-orange card, and shabby shutters & tumbled glass for the blue-green card.
3) The tree stamp and the sentiment were then stamped with Versafine Onyx Black ink.
4) Coloured rhinestones were applied to the card, then stickles and/or liquid pearls added.

Some variations of the same design which I created:


Using 4270K spotted winter
& 30-140 christmas cheer

Using 4267K sparkling christmas & 30-087 winter wonders
& Distress Inks Summer Seasonal inks


Monday, August 15, 2011

Another Card for the Penny Black Nature Challenge

Ok, I admit I have been very slack at updating my blog posts in recent times, but I have been inspired by the talented ladies in the Penny Black Flickr Group (Penny Circle http://www.flickr.com/groups/pennyblackinc/) and I am attempting to keep this blog a little bit more current.... So here's another card which I created for the Penny Black Nature Card Challenge (which was on the Penny Black Blog on Aug 8, 2011 http://pennyblackinc.wordpress.com/).


Stamps Used:
Penny Black 4160K cheerful
7 gypsies library stamp - events

Other Supplies Used:
Distress inks - various colours
Versafine onyx black
Ink blending tool
Stickles - various colours
Glossy accents
White gel pen

Following on from my previous card where I used distress inks to create the backgrounds for my cards, I was wanting to experiment to see if I could use them to colour my image. I had read somewhere that you could "watercolour" your image using distress inkpads so I started by stamping the flower stamp (PB 4160K cheerful) on white cardstock with the versafine black, then picking up some colour from my distress inkpads with a waterbrush and painting them onto the stamped image. I wasn't satisfied with the colours - the water from the waterbrush pen diluted the ink too much and the colours looked "washed out". I decided to use the ink blending tool instead to sponge colour onto the flower image. With a newly stamped flower image, I started by sponging on the lightest colour first (eg. tumbled glass for the blue flower), then adding darker accents (broken chine & stormy sky) to the centre and edges of the flower. I made a total of 5 flowers in different colours, and chose the best 3 for the card and cut out them out. At this point, although I was quite happy with the colours, the flower seem to lack dimension... so, seeking inspiration, I flipped open the Penny Black Touch of Whimsy Catalog 2011 and had a look at some of the cards in it. The flower on the back cover caught my eye, the designer Kathy Racoosin (http://thedailymarker.blogspot.com/) had added white highlights to her flower to give it dimension. I thought it looked amazing and decided to borrow her idea. On top of that, I added some coloured stickles glitter glue to my flower centres & petals, and when that dried, added some glossy accents over the top for the flower centres. I also stamped a whole bunch of the leaves, sponged on some green distress inks and cut out. I attached the leaves to the card with double-sided tape, then attached the flowers on with foam tape. I stamped the "thinking of you" from the 7 gypsies library stamp, punched it out and attached it to the card to finish.


Here is a close up of the flowers I did.


Penny Black Nature Challenge

Here are a couple of cards which I created for the Penny Black Nature Card Challenge on the Penny Black Blog (http://pennyblackinc.wordpress.com/) for the week beginning Aug 8 2011.


Stamps Used:

Penny Black 3989K joyeux noel
Penny Black 1999L letter background
Penny Black 3939K queen anne's lace
Penny Black 30-018 crystalline


Other Supplies Used:

Distress Inks - Barn Door, Fired Brick, Worn Lipstick, Dried Marigold, Spiced Marmalade, Mustard Seed
Ink Blending tool & foam
Versafine Onyx Black ink
Stickles - Golden Rod, Xmas Red & Candy Cane
Opalite Ink - Golden Mist & Crystal Blush
EK Success Photo Label Punch
McGill Vintage Label Punch

The background on both cards was created by first stamping randomly on white cardstock with the queen anne's lace stamp. I used different colours of distress ink - mainly barn door, worn lipstick and fired brick (sparingly). Then I used the ink blending tool to apply more distrss ink in various colours over the stamped piece, filling in most of the white areas - I concentrated the red colours on the edge, and the orange & yellow colours towards the middle. I then masked off parts of the image with scrap paper, and stamped the letter background stamp on the exposed areas. I then sponged on a bit of Opalite Ink (crystal blush around the edge & golden mist towards the middle). Next, I inked up the joyeux noel (cardinal on branch) stamp with the black versafine, taking care not to ink up the "joyeux noel" sentiment, and stamped this over the created background. I then inked up the "joyeux noel" sentiment, and stamped that on a small piece of white card. I punched the sentiment out, and lightly applied some distress ink on it, then layered over a small oval punched out of black cardstock. I finished the card by adding some Stickles glitter glue to the berries on the stamped image. The second card was created in a similar fashion to the first, except I used the "season's greetings" sentiment stamp out of the crystalline clear set.

Related Posts Plugin for WordPress, Blogger...