Monday, September 10, 2012

Penny Black Mini Cards

I read about the Penny Black Mini Card Contest a couple of days ago, but my weekend was so busy that I didn't get round to creating an entry for the contest over the weekend and was reluctantly going to give it a miss. Fortunately, with the time difference between Australia & US, the contest didn't close until Monday 5pm AEST (12am PST). At 3pm Monday afternoon, with just under 2 hours to go, I decided to try and quickly get an entry in.

I quickly scanned through my stamp stash, trying to decide what to use, when I came across this cute little  set:

30-103 ...wishes

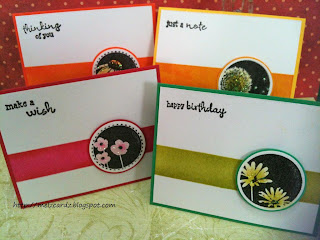
I've had this stamp set in my stash for some time, but only ever used the little sentiments out of it. I decided to give them a go and after a bit of experimenting, this is what I came up with. They were pretty quick and easy to do, and once I made the first one, I was able to knock together the remaining 3 cards in quick succession.


Supplies:
Penny Black 30-103 ... wishes
Versafine Onyx Black
Stickles Glitter Glue - Crystal
Red Card: Picked Raspberry, Fired Brick & Spun Sugar Distress Ink
Green Card: Shabby Shutters & Crushed Olive Distress Ink
Orange Card: Dried Marigold, Ripe Persimmon & Squeezed Lemonade Distress Ink
Yellow Card: Mustard Seed, Spiced Marmalade & Squeezed Lemonade Distress Ink
Ink blending tools & mini daubers
Circle punches - 1-1/2" & 40mm

1) To start, I masked off a small piece of white card with scrap card, leaving a 2cm panel. For the red card, I first sponged on Picked Raspberry distress ink, then applied some Fired Brick on the edges.
2) I trimmed the card to the correct size, stamped on the sentiment in the top corner, and attached to a small red card.
3) The flower stamp was inked with Versafine Onyx Black and stamped onto white card. A little bit of Spun Sugar and Picked Raspberry distress inks were added to the flowers with a dauber. This was then punched with a 1-1/2" circle punch and layered onto a red circle punchie (40mm), and stuck on the card with foam tape. A little Stickles was added to the image to finish.
4) The finished card size, approximate 3'x4"

Once the 4 cards were finished, I quickly photographed them (taking care not to smudge the Stickles, which were still a bit wet), uploaded them to my computer and did minor "photoshop" adjustments to the pictures (I use my iPhone 3 to photograph them and unfortunately this model doesn't have a flash, so my pictures inevitably are always a bit dark, so I have to "brighten" them on the computer). Realising I had less than 10mins to go until the deadline, I frantically uploaded them to my Flickr, then to the Penny Black Flickr Group (Penny Circle). Whew! Done, with 2 minutes to spare!! Talk about a close one!!

Here are a couple of close-ups of the cards:


Saturday, September 8, 2012

Melbourne Paperific Make & Takes Aug 2012

I made up some cards for the recent Melbourne Paperific Papercrafts Expo - we ran some Make & Takes using the gorgeous Penny Black 2012 Christmas stamps. For those who couldn't join us at the Expo, I have listed the materials list and instructions.


Red-Orange Card:

  • Penny Black 4273K winter berries
  • Penny Black 4289E beautiful season
  • Tim Holtz Distress Inks - Barn Door & Spiced Marmalade
Blue-Green Card:
  • Penny Black 4272K a splash of winter
  • Penny Black 30-140 christmas cheer
  • Tim Holtz Distress Inks - Shabby Shutters & Tumbled Glass

In addition, we also used on both cards: 
  • Ranger Inkssentials Ink Blending Tools
  • Ranger Stickles & Liquid Pearls
  • Tsukineko Versafine Onyx Black
  • Plaid Simply Stencils (blank stencil)
  • Spellbinders Nestabilities Small Mega Deckled Rectangles 
  • Dragonfly Crafts Self-adhesive Rhinestones
1) A stencil template was cut from a blank stencil using Spellbinders Nestabilites Small Mega Deckled Rectangles. (If you do not have a blank stencil, simply cut from a piece of blank cardstock, preferably gloss).
2) The template was used as a mask and distress inks were applied to the card within the template window using the ink blending tools - barn door & spiced marmalade for the red-orange card, and shabby shutters & tumbled glass for the blue-green card.
3) The tree stamp and the sentiment were then stamped with Versafine Onyx Black ink.
4) Coloured rhinestones were applied to the card, then stickles and/or liquid pearls added.

Some variations of the same design which I created:


Using 4270K spotted winter
& 30-140 christmas cheer

Using 4267K sparkling christmas & 30-087 winter wonders
& Distress Inks Summer Seasonal inks


Related Posts Plugin for WordPress, Blogger...